
Key Takeaways / Quick Answer
- A loud car cabin is almost never a single-source problem — road noise, exhaust leaks, failing wheel bearings, worn mounts, and inadequate sound deadening compound each other simultaneously.
- Diagnosis by noise character is the fastest diagnostic path: a cyclic drone that shifts during lane changes = wheel bearing; a raspy blat under acceleration = exhaust leak; a high-frequency whistle at highway speed = failed door/window weatherstripping.
- Tools you’ll need: mechanic’s stethoscope, torque wrench, automotive NVH (Noise, Vibration, and Harshness) meter or smartphone dB app, floor jack and jack stands, and a flashlight for undercar inspection.
- Fix hierarchy matters — always resolve mechanical noise sources (bearings, mounts, exhaust) before investing in acoustic treatment; adding Dynamat over a failing wheel bearing is money wasted.
Why Is My Car So Loud? A Complete Diagnostic & Repair Guide
Your car didn’t get loud overnight — even when it feels that way. What you’re experiencing is NVH (Noise, Vibration, and Harshness) degradation, an engineering term that captures the gradual accumulation of mechanical wear, structural fatigue, and acoustic insulation breakdown that every vehicle undergoes across its service life.
The factory NVH package on your car was a carefully engineered system: specific tire compounds, calibrated bushing durometers, tuned exhaust back-pressure, multi-layer floor insulation, and precision-fitted door seals. When any one of those elements degrades — and they all degrade at different rates — the noise floor in your cabin climbs.
This guide gives you the full diagnostic and repair matrix, from the cheapest no-tool fixes to structural acoustic treatment, ordered by both frequency-of-occurrence and cost-to-fix. We’ll go deeper than surface-level advice and give you the specifications, torque values, and diagnostic procedures a working technician would actually use.
The NVH Diagnostic Framework: How to Identify What You’re Actually Hearing
Before reaching for a wrench or a roll of Dynamat, you need to correctly classify the noise. Mechanics divide cabin noise into three categories:
Structure-borne noise travels through solid components — suspension, chassis, engine mounts — and is felt as vibration before it becomes audible. It rises sharply with vehicle speed and road roughness.
Airborne noise travels through the air and enters through gaps, thin body panels, and deteriorated insulation. It presents as a constant ambient roar, whistle, or drone independent of mechanical feel.
Resonance/sympathetic vibration occurs when a loose trim panel, heat shield, or body component vibrates at its natural frequency in response to another noise source. This produces buzzes, rattles, and ticks that are often wildly misdiagnosed.
The diagnostic sequence below maps each noise type to its source, its mechanical cause, and its fix.

Cause #1: Tires — The #1 Contributor to Road Noise by Volume
Tires are responsible for the majority of structure-borne road noise in passenger vehicles. The contact patch between a 235/45R18 tire and tarmac generates three distinct noise mechanisms simultaneously:
- Air pumping: Air is compressed and expelled as tread blocks contact and leave the road surface. Aggressive tread patterns (large block designs, open shoulders) pump more air and generate more decibels.
- Tread impact: Each tread element strikes the road and generates a micro-shock that transmits through the tire sidewall, wheel, hub bearing, spindle, and into the unibody or frame.
- Stick-slip friction: At highway speeds, the transition between tire adhesion and release creates a high-frequency hiss.
What to Check
- Inflation pressure: Under-inflated tires flex excessively, generating additional heat and amplifying all three noise mechanisms. Check cold inflation against the door jamb placard (not the max PSI on the tire sidewall — that’s a maximum rating, not the operating spec). Most passenger cars run 32–36 PSI cold; trucks and SUVs 35–45 PSI. If you’re unsure how often you should be checking this, our guide on how often you should put air in your tires covers the proper intervals in detail.
- Tire wear pattern: Feathering (sawtooth wear on individual tread blocks) indicates suspension misalignment and generates a pronounced hiss. Cupping or scalloping (high-low wear every 3–4 inches around circumference) indicates worn shocks/struts and produces a rhythmic thudding.
- Tread depth: Below 4/32″, the tire’s void ratio changes, and road noise typically increases. Below 2/32″ is legally unsafe in most states.
Tire Noise Levels by Category (SAE Testing Data)
| Tire Category | Typical Pass-By Noise (dB) | Primary Use | NVH Performance |
|---|---|---|---|
| Max Performance Summer | 72–75 dB | Track/sport driving | Poor (aggressive tread) |
| Ultra-High Performance All-Season | 69–72 dB | Sport sedans | Below average |
| Standard All-Season | 66–70 dB | Daily drivers | Average |
| Grand Touring All-Season | 63–67 dB | Comfort-focused | Above average |
| Touring / Eco | 61–65 dB | Fuel-efficient commuters | Excellent |
| Dedicated Winter | 68–74 dB | Snow/ice | Poor on dry pavement |
Fix: Inflate to door jamb spec. Rotate every 5,000–7,500 miles. If replacing, specify UTQG treadwear 500+ touring compounds. Brands with consistently strong NVH scores include Michelin CrossClimate 2, Continental TrueContact Tour, and Bridgestone Ecopia series.
Cause #2: Exhaust System Leaks and Component Failures
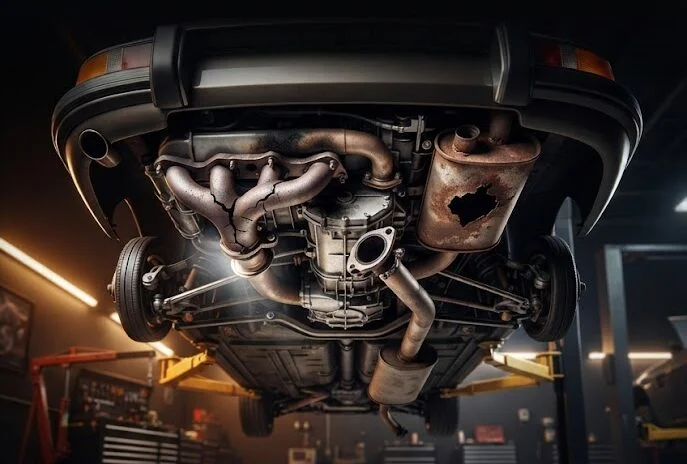
An exhaust leak is one of the most immediately noticeable and mechanically dangerous noise sources in any vehicle. The exhaust system operates at temperatures ranging from 400°F at the manifold to 1,200–1,600°F at the turbine inlet on turbocharged applications, and under significant cyclic thermal stress. This causes cracking at welds, flange separation, and gasket failure over time.
Exhaust Leak Locations and Symptoms
Manifold crack or manifold gasket failure: Produces a sharp, ticking/tapping noise that is loudest at cold start and may diminish as the metal expands when hot. Found directly at the cylinder head-to-manifold junction. This is a high-priority repair — exhaust gases contain carbon monoxide and can enter the cabin via HVAC fresh-air intake.
Flange gasket failure (mid-pipe to catalytic converter): Creates a loud raspiness under acceleration load. Often visible as a black carbon ring around the flange bolts.
Resonator or muffler perforation: Produces a droning, hollow exhaust note, especially at cruise RPM. Caused by moisture accumulation and internal corrosion.
Flex pipe separation: The braided stainless flex section on many front-wheel drive vehicles cracks longitudinally after 80,000–120,000 miles. Creates a loud rasp that worsens under load.
Understanding how long you can safely operate a vehicle with a confirmed exhaust leak matters — and it isn’t long. Our in-depth article on how long you can drive with an exhaust leak covers the safety and legal thresholds you need to know.
Diagnostic Procedure
- Cold start the engine with hood open. Listen at the manifold/head junction with a mechanic’s stethoscope. A ticking that cycles with engine RPM confirms a manifold leak.
- With the engine at operating temperature (never cold — thermal expansion affects readings), use a mechanic’s mirror and penlight to inspect all flange joints for black carbon deposits.
- Perform a rag-at-tailpipe backpressure test: briefly restricting the tailpipe while a helper revs the engine can cause audible changes near leaks — use extreme caution and do not block more than 1–2 seconds.
Exhaust Manifold Bolt Torque Specifications (Common Applications)
| Application | Manifold Bolt Torque | Sequence | Thread Sealant |
|---|---|---|---|
| Honda/Acura 4-cyl K-series | 33 ft-lbs (45 Nm) | Inside-out, 3 passes | None required |
| Toyota 2GR-FE V6 | 25 ft-lbs (34 Nm) + re-torque hot | Center-out | None required |
| Ford 5.0 Coyote V8 | 18 ft-lbs (24 Nm) | Sequence per FSM | Anti-seize on studs |
| GM LS-series V8 | 15 ft-lbs (20 Nm) first pass, then 37 ft-lbs (50 Nm) | Center-out | None required |
| BMW N54 turbo inline-6 | 18 ft-lbs (25 Nm) | Front-to-rear | None required |
| Subaru EJ255 flat-4 | 23 ft-lbs (31 Nm) | Center-out, 2 passes | Copper anti-seize |
Critical note: Always replace exhaust manifold gaskets when re-torquing. Compressed graphite or multi-layer steel (MLS) gaskets do not re-seal once removed. Torquing onto an old gasket is a re-repair waiting to happen.

Cause #3: Wheel Bearings — The Misdiagnosed Drone
A failing wheel bearing produces one of the most commonly misdiagnosed sounds in automotive repair: a cyclic drone or hum that mimics tire noise almost perfectly to the untrained ear.
How to Differentiate Wheel Bearing Noise from Tire Noise
This is the critical diagnostic question. Here’s the field test that separates them:
Speed sensitivity: Both increase with speed. However, tire noise increases linearly with speed; a failing wheel bearing produces a noise that rises more steeply above 40 mph as centrifugal force loads the deteriorated bearing races.
Lane change test: At highway speed (65–70 mph), make a smooth lane change to the left. If the noise decreases, the problem bearing is on the left side (weight transfers right, unloading the left bearing). Make a lane change to the right — noise decreases = right side bearing. This works because lateral weight transfer changes the radial load on each bearing.
Jack and rotate test: With the suspect corner safely lifted on jack stands, grasp the wheel at 12 and 6 o’clock and attempt to rock it. Any play beyond 0.002″ of axial runout is abnormal. Spin the wheel by hand — a rough, grinding, or gritty feel confirms bearing damage.
Wheel Bearing Hub Assembly Replacement Torque Specs
| Vehicle | Hub Nut Torque | Hub Bolt Torque | Special Instructions |
|---|---|---|---|
| Toyota Camry/Corolla (FWD) | 159 ft-lbs (216 Nm) | 59 ft-lbs (80 Nm) | New cotter pin required |
| Honda Civic/Accord (FWD) | 181 ft-lbs (245 Nm) | 85 ft-lbs (115 Nm) | New spindle nut required |
| Ford F-150 (4WD, front) | 184 ft-lbs (250 Nm) | 133 ft-lbs (180 Nm) | Torque-to-yield; new nut required |
| Chevrolet Silverado (4WD) | 177 ft-lbs (240 Nm) | 107 ft-lbs (145 Nm) | Apply Loctite 242 to bolts |
| BMW 3-Series (rear) | 129 ft-lbs (175 Nm) + 90° rotation | — | Always replace nut; cannot be re-used |
| Subaru Outback/Forester | 137 ft-lbs (185 Nm) | 71 ft-lbs (96 Nm) | New self-locking nut required |
Safety-critical note: Wheel bearing hub nuts are almost universally torque-to-yield single-use fasteners. A used hub nut re-torqued to spec can fail under load. Never reuse them. Cost is typically $2–$8.
Cause #4: Engine and Transmission Mount Degradation
Engine and transmission mounts perform two simultaneous jobs: they support the powertrain against gravitational and torque loads, and they isolate powertrain vibration from the chassis via a bonded rubber-to-metal damping element. When the rubber hydrolyzes, cracks, or separates from its metal insert, both functions degrade simultaneously.
Failure Modes
Hydraulic mount collapse: Many modern mounts are hydraulic-fluid-filled for superior low-frequency damping. A ruptured diaphragm causes the fluid to leak internally, turning a hydraulic mount into a simple rubber mount overnight. The tell: a sudden increase in low-frequency idle drone and vibration felt through the floorboards, steering wheel, and shifter.
Rubber hardening: Over time, heat-cycling causes the elastomeric compound to lose compliance. The mount still supports the powertrain but transmits higher-frequency vibration more efficiently into the chassis.
Complete separation: The rubber delaminates from the metal insert entirely. This produces a loud clunk on takeoff or gear change as the powertrain shifts against its travel limits.
Diagnostic Procedure
With the engine running at idle, observe the powertrain from the engine bay. If accessible, place a long wooden dowel or pry bar gently between the engine/trans and the subframe — you’ll feel the vibration frequency change if a mount is collapsed. A better test: have a helper blip the throttle from idle to 2,000 RPM while you observe. More than 3/4″ of powertrain movement in any direction indicates a mount that has lost its compliance.
Typical Mount Replacement Costs
| Component | DIY Parts Cost | Labor (Shop) | Total Installed (Shop) |
|---|---|---|---|
| Front Engine Mount | $45–$120 | $80–$150 | $125–$270 |
| Rear Engine/Trans Mount | $35–$95 | $90–$200 | $125–$295 |
| Transmission Mount | $40–$110 | $100–$180 | $140–$290 |
| Dog Bone/Torque Strut | $35–$85 | $60–$100 | $95–$185 |
| Full Set (all 3–4 mounts) | $130–$350 | $300–$550 | $430–$900 |
Cause #5: Suspension Bushings and Worn Dampers
Suspension rubber bushings — control arm bushings, sway bar end links, trailing arm bushings — degrade through the same heat-cycling, ozone exposure, and compression set as engine mounts. When they go, the metal-to-metal contact that results is a direct high-frequency vibration path into the chassis.
Strut bearing plate failure deserves specific mention. The upper strut mount contains a bearing that allows the strut to rotate during steering. A worn bearing produces a creaking or clunking noise over slow-speed bumps and during parking maneuver turns — often wrongly diagnosed as a CV axle problem.
Quick Bushing Check
Raise the vehicle on jack stands. Using a pry bar, apply moderate force to each control arm at the bushing pivot point. Any movement beyond what feels like elastic compression (i.e

